Software Management
Generalities
On a Linux system, it is possible to install software in two ways:
- Using an installation package;
- Compiling from source files.
Note
Installing from source is not covered here. As a rule, you should use the package method unless the software you want is not available via the package manager. The reason for this is that dependencies are generally managed by the package system, whereas with source, you need to manage the dependencies manually.
The package: This is a single file containing all the data needed to install the program. It can be executed directly on the system from a software repository.
The source files: Some software is not provided in packages ready to be installed, but via an archive containing the source files. It is up to the administrator to prepare these files and compile them to install the program.
RPM: RedHat Package Manager
RPM (RedHat Package Manager) is a software management system. It is possible to install, uninstall, update or check software contained in packages.
RPM is the format used by all RedHat based distributions (RockyLinux, Fedora, CentOS, SuSe, Mandriva, ...). Its equivalent in the Debian world is DPKG (Debian Package).
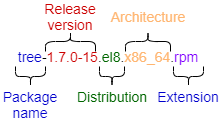
The name of an RPM package follows a specific nomenclature:
rpm command
The rpm command allows you to install a package.
rpm [-i][-U] package.rpm [-e] package
Example (for a package named 'package'):
rpm -ivh package.rpm
| Option | Description |
|---|---|
-i package.rpm |
Installs the package. |
-U package.rpm |
Updates an already installed package. |
-e package.rpm |
Uninstalls the package. |
-h |
Displays a progress bar. |
-v |
Informs about the progress of the operation. |
--test |
Tests the command without executing it. |
The rpm command also allows you to query the system package database by adding the -q option.
It is possible to execute several types of queries to obtain different information about the installed packages. The RPM database is located in the directory /var/lib/rpm.
Example:
rpm -qa
This command queries all the packages installed on the system.
rpm -q [-a][-i][-l] package [-f] file
Example:
rpm -qil package
rpm -qf /path/to/file
| Option | Description |
|---|---|
-a |
Lists all packages installed on the system. |
-i __package__ |
Displays the package information. |
-l __package__ |
Lists the files contained in the package. |
-f |
Shows the name of the package containing the specified file. |
--last |
The list of packages is given by installation date (the last installed packages appear first). |
Warning
After the -q option, the package name must be exact. Metacharacters (wildcards) are not supported.
Tip
However, it is possible to list all installed packages and filter with the grep command.
Example: list the last installed packages:
sudo rpm -qa --last | head
NetworkManager-config-server-1.26.0-13.el8.noarch Mon 24 May 2021 02:34:00 PM CEST
iwl2030-firmware-18.168.6.1-101.el8.1.noarch  Mon 24 May 2021 02:34:00 PM CEST
iwl2000-firmware-18.168.6.1-101.el8.1.noarch  Mon 24 May 2021 02:34:00 PM CEST
iwl135-firmware-18.168.6.1-101.el8.1.noarch   Mon 24 May 2021 02:34:00 PM CEST
iwl105-firmware-18.168.6.1-101.el8.1.noarch   Mon 24 May 2021 02:34:00 PM CEST
iwl100-firmware-39.31.5.1-101.el8.1.noarch    Mon 24 May 2021 02:34:00 PM CEST
iwl1000-firmware-39.31.5.1-101.el8.1.noarch   Mon 24 May 2021 02:34:00 PM CEST
alsa-sof-firmware-1.5-2.el8.noarch            Mon 24 May 2021 02:34:00 PM CEST
iwl7260-firmware-25.30.13.0-101.el8.1.noarch  Mon 24 May 2021 02:33:59 PM CEST
iwl6050-firmware-41.28.5.1-101.el8.1.noarch   Mon 24 May 2021 02:33:59 PM CEST
Example: list the installation history of the kernel:
sudo rpm -qa --last kernel
kernel-4.18.0-305.el8.x86_64                  Tue 25 May 2021 06:04:56 AM CEST
kernel-4.18.0-240.22.1.el8.x86_64             Mon 24 May 2021 02:33:35 PM CEST
Example: list all installed packages with a specific name using grep:
sudo dnf list installed | grep httpd
centos-logos-httpd.noarch           80.5-2.el8                              @baseos
httpd.x86_64                        2.4.37-30.module_el8.3.0+561+97fdbbcc   @appstream
httpd-filesystem.noarch             2.4.37-30.module_el8.3.0+561+97fdbbcc   @appstream
httpd-tools.x86_64                  2.4.37-30.module_el8.3.0+561+97fdbbcc   @appstream
DNF: Dandified Yum
DNF (Dandified Yum) is a software package manager, successor of YUM (Yellow dog Updater Modified). It works with RPM packages grouped in a local or remote repository (a directory for storing packages). For the most common commands, its usage is identical to that of yum.
The dnf command allows the management of packages by comparing those installed on the system with those in the repositories defined on the server. It also automatically installs dependencies, if they are also present in the repositories.
dnf is the manager used by many RedHat based distributions (RockyLinux, Fedora, CentOS, ...). Its equivalent in the Debian world is APT (Advanced Packaging Tool).
dnf command
The dnf command allows you to install a package by specifying only the short name.
dnf [install][remove][list all][search][info] package
Example:
dnf install tree
Only the short name of the package is required.
| Option | Description |
|---|---|
install |
Installs the package. |
remove |
Uninstall the package. |
list all |
Lists the packages already in the repository. |
search |
Search for a package in the repository. |
provides */command_name |
Search for a command. |
info |
Displays the package information. |
autoremove |
Removes all packages installed as dependencies but no longer needed. |
The dnf install command allows you to install the desired package without worrying about its dependencies, which will be resolved directly by dnf itself.
dnf install nginx
Last metadata expiration check: 3:13:41 ago on Wed 23 Mar 2022 07:19:24 AM CET.
Dependencies resolved.
============================================================================================================================
 Package                             Architecture    Version                                        Repository         Size
============================================================================================================================
Installing:
 nginx                               aarch64         1:1.14.1-9.module+el8.4.0+542+81547229         appstream         543 k
Installing dependencies:
 nginx-all-modules                   noarch          1:1.14.1-9.module+el8.4.0+542+81547229         appstream          22 k
 nginx-mod-http-image-filter         aarch64         1:1.14.1-9.module+el8.4.0+542+81547229         appstream          33 k
 nginx-mod-http-perl                 aarch64         1:1.14.1-9.module+el8.4.0+542+81547229         appstream          44 k
 nginx-mod-http-xslt-filter          aarch64         1:1.14.1-9.module+el8.4.0+542+81547229         appstream          32 k
 nginx-mod-mail                      aarch64         1:1.14.1-9.module+el8.4.0+542+81547229         appstream          60 k
 nginx-mod-stream                    aarch64         1:1.14.1-9.module+el8.4.0+542+81547229         appstream          82 k

Transaction Summary
============================================================================================================================
Install  7 Packages

Total download size: 816 k
Installed size: 2.2 M
Is this ok [y/N]:
In case you don't remember the exact name of the package, you can search for it with the command dnf search name. As you can see, there is a section that contains the exact name and another one that contains the package correspondence, all of which are highlighted for easier searching.
dnf search nginx
Last metadata expiration check: 0:20:55 ago on Wed 23 Mar 2022 10:40:43 AM CET.
=============================================== Name Exactly Matched: nginx ================================================
nginx.aarch64 : A high performance web server and reverse proxy server
============================================== Name & Summary Matched: nginx ===============================================
collectd-nginx.aarch64 : Nginx plugin for collectd
munin-nginx.noarch : NGINX support for Munin resource monitoring
nginx-all-modules.noarch : A meta package that installs all available Nginx modules
nginx-filesystem.noarch : The basic directory layout for the Nginx server
nginx-mod-http-image-filter.aarch64 : Nginx HTTP image filter module
nginx-mod-http-perl.aarch64 : Nginx HTTP perl module
nginx-mod-http-xslt-filter.aarch64 : Nginx XSLT module
nginx-mod-mail.aarch64 : Nginx mail modules
nginx-mod-stream.aarch64 : Nginx stream modules
pagure-web-nginx.noarch : Nginx configuration for Pagure
pcp-pmda-nginx.aarch64 : Performance Co-Pilot (PCP) metrics for the Nginx Webserver
python3-certbot-nginx.noarch : The nginx plugin for certbot
Another way to search for a package by entering an additional search key is to send the result of the dnf command through a pipe to the grep command with the desired key.
dnf search nginx | grep mod
Last metadata expiration check: 3:44:49 ago on Wed 23 Mar 2022 06:16:47 PM CET.
nginx-all-modules.noarch : A meta package that installs all available Nginx modules
nginx-mod-http-image-filter.aarch64 : Nginx HTTP image filter module
nginx-mod-http-perl.aarch64 : Nginx HTTP perl module
nginx-mod-http-xslt-filter.aarch64 : Nginx XSLT module
nginx-mod-mail.aarch64 : Nginx mail modules
nginx-mod-stream.aarch64 : Nginx stream modules
The dnf remove command removes a package from the system and its dependencies. Below is an excerpt of the dnf remove httpd command.
dnf remove httpd
Dependencies resolved.
============================================================================================================================
 Package                        Architecture    Version                                            Repository          Size
============================================================================================================================
Removing:
 httpd                          aarch64         2.4.37-43.module+el8.5.0+727+743c5577.1            @appstream         8.9 M
Removing dependent packages:
 mod_ssl                        aarch64         1:2.4.37-43.module+el8.5.0+727+743c5577.1          @appstream         274 k
 php                            aarch64         7.4.19-1.module+el8.5.0+696+61e7c9ba               @appstream         4.4 M
 python3-certbot-apache         noarch          1.22.0-1.el8                                       @epel              539 k
Removing unused dependencies:
 apr                            aarch64         1.6.3-12.el8                                       @appstream         299 k
 apr-util                       aarch64         1.6.1-6.el8.1                                      @appstream         224 k
 apr-util-bdb                   aarch64         1.6.1-6.el8.1                                      @appstream          67 k
 apr-util-openssl               aarch64         1.6.1-6.el8.1                                      @appstream          68 k
 augeas-libs                    aarch64         1.12.0-6.el8                                       @baseos            1.4 M
 httpd-filesystem               noarch          2.4.37-43.module+el8.5.0+727+743c5577.1            @appstream         400
 httpd-tools                    aarch64         2.4.37-43.module+el8.5.0+727+743c5577.1
...
The dnf list command lists all the packages installed on the system and present in the repository. It accepts several parameters:
| Parameter | Description |
|---|---|
all |
Lists the installed packages and then those available on the repositories. |
available |
Lists only the packages available for installation. |
updates |
Lists packages that can be upgraded. |
obsoletes |
Lists the packages made obsolete by higher versions available. |
recent |
Lists the latest packages added to the repository. |
The dnf info command, as you might expect, provides detailed information about a package:
dnf info firewalld
Last metadata expiration check: 15:47:27 ago on Tue 22 Mar 2022 05:49:42 PM CET.
Installed Packages
Name         : firewalld
Version      : 0.9.3
Release      : 7.el8
Architecture : noarch
Size         : 2.0 M
Source       : firewalld-0.9.3-7.el8.src.rpm
Repository   : @System
From repo    : baseos
Summary      : A firewall daemon with D-Bus interface providing a dynamic firewall
URL          : http://www.firewalld.org
License      : GPLv2+
Description  : firewalld is a firewall service daemon that provides a dynamic customizable
             : firewall with a D-Bus interface.

Available Packages
Name         : firewalld
Version      : 0.9.3
Release      : 7.el8_5.1
Architecture : noarch
Size         : 501 k
Source       : firewalld-0.9.3-7.el8_5.1.src.rpm
Repository   : baseos
Summary      : A firewall daemon with D-Bus interface providing a dynamic firewall
URL          : http://www.firewalld.org
License      : GPLv2+
Description  : firewalld is a firewall service daemon that provides a dynamic customizable
             : firewall with a D-Bus interface.
Sometimes you only know the executable you want to use but not the package that contains it, in this case you can use the command dnf provides */package_name which will search the database for you for the desired match.
Example of a search for the semanage command:
dnf provides */semanage
Last metadata expiration check: 1:12:29 ago on Wed 23 Mar 2022 10:40:43 AM CET.
libsemanage-devel-2.9-6.el8.aarch64 : Header files and libraries used to build policy manipulation tools
Repo        : powertools
Matched from:
Filename    : /usr/include/semanage

policycoreutils-python-utils-2.9-16.el8.noarch : SELinux policy core python utilities
Repo        : baseos
Matched from:
Filename    : /usr/sbin/semanage
Filename    : /usr/share/bash-completion/completions/semanage
The dnf autoremove command does not need any parameters. Dnf takes care of searching for candidate packages for removal.
dnf autoremove
Last metadata expiration check: 0:24:40 ago on Wed 23 Mar 2022 06:16:47 PM CET.
Dependencies resolved.
Nothing to do.
Complete!
Other useful dnf options
| Option | Description |
|---|---|
repolist |
Lists the repositories configured on the system. |
grouplist |
Lists available package collections. |
clean |
Removes temporary files. |
The dnf repolist command lists the repositories configured on the system. By default, it lists only the enabled repositories but can be used with these parameters:
| Parameter | Description |
|---|---|
--all |
Lists all the repositories. |
--enabled |
Default |
--disabled |
Lists only disabled repositories. |
Example:
dnf repolist
repo id                                                  repo name
appstream                                                Rocky Linux 8 - AppStream
baseos                                                   Rocky Linux 8 - BaseOS
epel                                                     Extra Packages for Enterprise Linux 8 - aarch64
epel-modular                                             Extra Packages for Enterprise Linux Modular 8 - aarch64
extras                                                   Rocky Linux 8 - Extras
powertools                                               Rocky Linux 8 - PowerTools
rockyrpi                                                 Rocky Linux 8 - Rasperry Pi
And an excerpt of the command with the --all flag.
dnf repolist --all

...
repo id                                             repo name                                                                                       status
appstream                                           Rocky Linux 8 - AppStream                                                                       enabled
appstream-debug                                     Rocky Linux 8 - AppStream - Source                                                              disabled
appstream-source                                    Rocky Linux 8 - AppStream - Source                                                              disabled
baseos                                              Rocky Linux 8 - BaseOS                                                                          enabled
baseos-debug                                        Rocky Linux 8 - BaseOS - Source                                                                 disabled
baseos-source                                       Rocky Linux 8 - BaseOS - Source                                                                 disabled
devel                                               Rocky Linux 8 - Devel WARNING! FOR BUILDROOT AND KOJI USE                                       disabled
epel                                                Extra Packages for Enterprise Linux 8 - aarch64                                                 enabled
epel-debuginfo                                      Extra Packages for Enterprise Linux 8 - aarch64 - Debug                                         disabled
epel-modular                                        Extra Packages for Enterprise Linux Modular 8 - aarch64                                         enabled
epel-modular-debuginfo                              Extra Packages for Enterprise Linux Modular 8 - aarch64 - Debug                                 disabled
epel-modular-source                                 Extra Packages for Enterprise Linux Modular 8 - aarch64 - Source
...
And below is an excerpt from the list of disabled repositories.
dnf repolist --disabled
repo id                                 repo name
appstream-debug                         Rocky Linux 8 - AppStream - Source
appstream-source                        Rocky Linux 8 - AppStream - Source
baseos-debug                            Rocky Linux 8 - BaseOS - Source
baseos-source                           Rocky Linux 8 - BaseOS - Source
devel                                   Rocky Linux 8 - Devel WARNING! FOR BUILDROOT AND KOJI USE
epel-debuginfo                          Extra Packages for Enterprise Linux 8 - aarch64 - Debug
epel-modular-debuginfo                  Extra Packages for Enterprise Linux Modular 8 - aarch64 - Debug
epel-modular-source                     Extra Packages for Enterprise Linux Modular 8 - aarch64 - Source
epel-source                             Extra Packages for Enterprise Linux 8 - aarch64 - Source
epel-testing                            Extra Packages for Enterprise Linux 8 - Testing - aarch64
...
Using the -v option enhances the list with a lot of additional information. Below you can see part of the result of the command.
dnf repolist -v

...
Repo-id            : powertools
Repo-name          : Rocky Linux 8 - PowerTools
Repo-revision      : 8.5
Repo-distro-tags      : [cpe:/o:rocky:rocky:8]:  ,  , 8, L, R, c, i, k, n, o, u, x, y
Repo-updated       : Wed 16 Mar 2022 10:07:49 PM CET
Repo-pkgs          : 1,650
Repo-available-pkgs: 1,107
Repo-size          : 6.4 G
Repo-mirrors       : https://mirrors.rockylinux.org/mirrorlist?arch=aarch64&repo=PowerTools-8
Repo-baseurl       : https://example.com/pub/rocky/8.8/PowerTools/x86_64/os/ (30 more)
Repo-expire        : 172,800 second(s) (last: Tue 22 Mar 2022 05:49:24 PM CET)
Repo-filename      : /etc/yum.repos.d/Rocky-PowerTools.repo
...
Using Groups
Groups are a collection of a set of packages (you can think of them as a virtual packages) that logically groups a set of applications to accomplish a purpose (a desktop environment, a server, development tools, etc.).
The dnf grouplist command lists all available groups.
dnf grouplist
Last metadata expiration check: 1:52:00 ago on Wed 23 Mar 2022 02:11:43 PM CET.
Available Environment Groups:
   Server with GUI
   Server
   Minimal Install
   KDE Plasma Workspaces
   Custom Operating System
Available Groups:
   Container Management
   .NET Core Development
   RPM Development Tools
   Development Tools
   Headless Management
   Legacy UNIX Compatibility
   Network Servers
   Scientific Support
   Security Tools
   Smart Card Support
   System Tools
   Fedora Packager
   Xfce
The dnf groupinstall command allows you to install one of these groups.
dnf groupinstall "Network Servers"
Last metadata expiration check: 2:33:26 ago on Wed 23 Mar 2022 02:11:43 PM CET.
Dependencies resolved.
================================================================================
 Package           Architecture     Version             Repository         Size
================================================================================
Installing Groups:
 Network Servers

Transaction Summary
================================================================================

Is this ok [y/N]:
Note that it is good practice to enclose the group name in double quotes as without the command it will only execute correctly if the group name does not contain spaces.
So a dnf groupinstall Network Servers produces the following error.
dnf groupinstall Network Servers
Last metadata expiration check: 3:05:45 ago on Wed 23 Mar 2022 02:11:43 PM CET.
Module or Group 'Network' is not available.
Module or Group 'Servers' is not available.
Error: Nothing to do.
The corresponding command to remove a group is dnf groupremove "name group".
The dnf clean command cleans all caches and temporary files created by dnf. It can be used with the following parameters.
| Parameters | Description |
|---|---|
all |
Removes all temporary files created for enabled repositories. |
dbcache |
Removes cache files for the repository metadata. |
expire-cache |
Remove the local cookie files. |
metadata |
Removes all the repositories metadata. |
packages |
Removes any cached packages. |
How DNF works
The DNF manager relies on one or more configuration files to target the repositories containing the RPM packages.
These files are located in /etc/yum.repos.d/ and must end with .repo in order to be used by DNF.
Example:
/etc/yum.repos.d/Rocky-BaseOS.repo
Each .repo file consists of at least the following information, one directive per line.
Example:
[baseos] # Short name of the repository
name=Rocky Linux $releasever - BaseOS # Short name of the repository #Detailed name
mirrorlist=http://mirrors.rockylinux.org/mirrorlist?arch=$basearch&repo=BaseOS-$releasever # http address of a list or mirror
#baseurl=http://dl.rockylinux.org/$contentdir/$releasever/BaseOS/$basearch/os/ # http address for direct access
gpgcheck=1 # Repository requiring a signature
enabled=1 # Activated =1, or not activated =0
gpgkey=file:///etc/pki/rpm-gpg/RPM-GPG-KEY-rockyofficial # GPG public key path
By default, the enabled directive is absent which means that the repository is enabled. To disable a repository, you must specify the enabled=0 directive.
DNF modules
Modules were introduced in Rocky Linux 8 by the upstream. In order to use modules, the AppStream repository must exist and be enabled.
Package Confusion
The creation of module streams in the AppStream repository caused a lot of people confusion. Since modules are packaged within a stream (see our examples below), a particular package would show up in our RPMs, but if an attempt was made to install it without enabling the module, nothing would happen. Remember to look at modules if you attempt to install a package and it fails to find it.
What are modules
Modules come from the AppStream repository and contain both streams and profiles. These can be described as follows:
-
module streams: A module stream can be thought of as a separate repository within the AppStream repository that contains different application versions. These module repositories contain the application RPMs, dependencies, and documentation for that particular stream. An example of a module stream in Rocky Linux 8 would be
postgresql. If you installpostgresqlusing the standardsudo dnf install postgresqlyou will get version 10. However, using modules, you can instead install versions 9.6, 12 or 13. -
module profiles: What a module profile does is take into consideration the use case for the module stream when installing the package. Applying a profile adjusts the package RPMs, dependencies and documentation to account for the module's use. Using the same
postgresqlstream in our example, you can apply a profile of either "server" or "client". Obviously, you do not need the same packages installed on your system if you are just going to usepostgresqlas a client to access a server.
Listing modules
You can obtain a list of all modules by executing the following command:
dnf module list
This will give you a long list of the available modules and the profiles that can be used for them. The thing is you probably already know what package you are interested in, so to find out if there are modules for a particular package, add the package name after "list". We will use our postgresql package example again here:
dnf module list postgresql
This will give you output that looks like this:
Rocky Linux 8 - AppStream
Name                       Stream                 Profiles                           Summary
postgresql                 9.6                    client, server [d]                 PostgreSQL server and client module
postgresql                 10 [d]                 client, server [d]                 PostgreSQL server and client module
postgresql                 12                     client, server [d]                 PostgreSQL server and client module
postgresql                 13                     client, server [d]                 PostgreSQL server and client module
Notice in the listing the "[d]". This means that this is the default. It shows that the default version is 10 and that regardless of which version you choose, if you do not specify a profile, then the server profile will be the profile used, as it is the default as well.
Enabling Modules
Using our example postgresql package, let's say that we want to enable version 12. To do this, you simply use the following:
dnf module enable postgresql:12
Here the enable command requires the module name followed by a ":" and the stream name.
To verify that you have enabled postgresql module stream version 12, use your list command again which should show you the following output:
Rocky Linux 8 - AppStream
Name                       Stream                 Profiles                           Summary
postgresql                 9.6                    client, server [d]                 PostgreSQL server and client module
postgresql                 10 [d]                 client, server [d]                 PostgreSQL server and client module
postgresql                 12 [e]                 client, server [d]                 PostgreSQL server and client module
postgresql                 13                     client, server [d]                 PostgreSQL server and client module
Here we can see the "[e]" for "enabled" next to stream 12, so we know that version 12 is enabled.
Installing packages from the module stream
Now that our module stream is enabled, the next step is to install postgresql, the client application for the postgresql server. This can be achieved by running the following command:
dnf install postgresql
Which should give you this output:
========================================================================================================================================
 Package                    Architecture           Version                                              Repository                 Size
========================================================================================================================================
Installing group/module packages:
 postgresql                 x86_64                 12.12-1.module+el8.6.0+1049+f8fc4c36                 appstream                 1.5 M
Installing dependencies:
 libpq                      x86_64                 13.5-1.el8                                           appstream                 197 k

Transaction Summary
========================================================================================================================================
Install  2 Packages
Total download size: 1.7 M
Installed size: 6.1 M
Is this ok [y/N]:
After approving by typing "y" you installed the application.
Installing packages from module stream profiles
It's also possible to directly install packages without even having to enable the module stream! In this example, let's assume that we only want the client profile applied to our installation. To do this, we simply enter this command:
dnf install postgresql:12/client
Which should give you this output:
========================================================================================================================================
 Package                    Architecture           Version                                              Repository                 Size
========================================================================================================================================
Installing group/module packages:
 postgresql                 x86_64                 12.12-1.module+el8.6.0+1049+f8fc4c36                 appstream                 1.5 M
Installing dependencies:
 libpq                      x86_64                 13.5-1.el8                                           appstream                 197 k
Installing module profiles:
 postgresql/client
Enabling module streams:
 postgresql                                        12

Transaction Summary
========================================================================================================================================
Install  2 Packages

Total download size: 1.7 M
Installed size: 6.1 M
Is this ok [y/N]:
Answering "y" to the prompt will install everything you need to use postgresql version 12 as a client.
Module Removal and Reset or Switch-To
After you install, you may decide that for whatever reason, you need a different version of the stream. The first step is to remove your packages. Using our example postgresql package again, we would do this with:
dnf remove postgresql
This will display similar output as the install procedure above, except it will be removing the package and all of its dependencies. Answer "y" to the prompt and hit enter to uninstall postgresql.
Once this step is complete, you can issue the reset command for the module using:
dnf module reset postgresql
Which will give you output like this:
Dependencies resolved.
========================================================================================================================================
 Package                         Architecture                   Version                           Repository                       Size
========================================================================================================================================
Disabling module profiles:
 postgresql/client
Resetting modules:
 postgresql

Transaction Summary
========================================================================================================================================

Is this ok [y/N]:
Answering "y" to the prompt will then reset postgresql back to the default stream with the stream that we had enabled (12 in our example) no longer enabled:
Rocky Linux 8 - AppStream
Name                       Stream                 Profiles                           Summary
postgresql                 9.6                    client, server [d]                 PostgreSQL server and client module
postgresql                 10 [d]                 client, server [d]                 PostgreSQL server and client module
postgresql                 12                     client, server [d]                 PostgreSQL server and client module
postgresql                 13                     client, server [d]                 PostgreSQL server and client module
Now you can use the default.
You can also use the switch-to sub-command to switch from one enabled stream to another. Using this method not only switches to the new stream, but installs the needed packages (either downgrade or upgrade) without a separate step. To use this method to enable postgresql stream version 13 and use the "client" profile, you would use:
dnf module switch-to postgresql:13/client
Disable a module stream
There may be times when you wish to disable the ability to install packages from a module stream. In the case of our postgresql example, this could be because you want to use the repository directly from PostgreSQL so that you could use a newer version (at the time of this writing, versions 14 and 15 are available from this repository). Disabling a module stream, makes installing any of those packages impossible without first enabling them again.
To disable the module streams for postgresql simply do:
dnf module disable postgresql
And if you list out the postgresql modules again, you will see the following showing all postgresql module versions disabled:
Rocky Linux 8 - AppStream
Name                       Stream                   Profiles                          Summary
postgresql                 9.6 [x]                  client, server [d]                PostgreSQL server and client module
postgresql                 10 [d][x]                client, server [d]                PostgreSQL server and client module
postgresql                 12 [x]                   client, server [d]                PostgreSQL server and client module
postgresql                 13 [x]                   client, server [d]                PostgreSQL server and client module
The EPEL repository
What is EPEL and how is it used?
EPEL (Extra Packages for Enterprise Linux) is an open-source and free community-based repository maintained by the EPEL Fedora Special Interest Group that provides a set of additional packages for RHEL (and CentOS, Rocky Linux, and others) from the Fedora sources.
It provides packages that are not included in the official RHEL repositories. These are not included because they are not considered necessary in an enterprise environment or deemed outside the scope of RHEL. We must not forget that RHEL is an enterprise class distribution, and desktop utilities or other specialized software may not be a priority for an enterprise project.
Installation
Installation of the necessary files can be easily done with the package provided by default from Rocky Linux.
If you are behind an internet proxy:
export http_proxy=http://172.16.1.10:8080
Then:
dnf install epel-release
Once installed you can check that the package has been installed correctly with the command dnf info.
dnf info epel-release
Last metadata expiration check: 1:30:29 ago on Thu 24 Mar 2022 09:36:42 AM CET.
Installed Packages
Name         : epel-release
Version      : 8
Release      : 14.el8
Architecture : noarch
Size         : 32 k
Source       : epel-release-8-14.el8.src.rpm
Repository   : @System
From repo    : epel
Summary      : Extra Packages for Enterprise Linux repository configuration
URL          : http://download.fedoraproject.org/pub/epel
License      : GPLv2
Description  : This package contains the Extra Packages for Enterprise Linux
             : (EPEL) repository GPG key as well as configuration for yum.
The package, as you can see from the package description above, does not contain executables, libraries, etc... but only the configuration files and GPG keys for setting up the repository.
Another way to verify the correct installation is to query the rpm database.
rpm -qa | grep epel
epel-release-8-14.el8.noarch
Now you need to run an update to let dnf recognize the repository. You will be asked to accept the GPG keys of the repositories. Clearly, you have to answer YES in order to use them.
dnf update
Once the update is complete you can check that the repository has been configured correctly with the dnf repolist command which should now list the new repositories.
dnf repolist
repo id            repo name
...
epel               Extra Packages for Enterprise Linux 8 - aarch64
epel-modular       Extra Packages for Enterprise Linux Modular 8 - aarch64
...
The repository configuration files are located in /etc/yum.repos.d/.
ll /etc/yum.repos.d/ | grep epel
-rw-r--r--. 1 root root 1485 Jan 31 17:19 epel-modular.repo
-rw-r--r--. 1 root root 1422 Jan 31 17:19 epel.repo
-rw-r--r--. 1 root root 1584 Jan 31 17:19 epel-testing-modular.repo
-rw-r--r--. 1 root root 1521 Jan 31 17:19 epel-testing.repo
And below we can see the contents of the file epel.repo.
[epel]
name=Extra Packages for Enterprise Linux $releasever - $basearch
# It is much more secure to use the metalink, but if you wish to use a local mirror
# place its address here.
#baseurl=https://download.example/pub/epel/$releasever/Everything/$basearch
metalink=https://mirrors.fedoraproject.org/metalink?repo=epel-$releasever&arch=$basearch&infra=$infra&content=$contentdir
enabled=1
gpgcheck=1
countme=1
gpgkey=file:///etc/pki/rpm-gpg/RPM-GPG-KEY-EPEL-8

[epel-debuginfo]
name=Extra Packages for Enterprise Linux $releasever - $basearch - Debug
# It is much more secure to use the metalink, but if you wish to use a local mirror
# place its address here.
#baseurl=https://download.example/pub/epel/$releasever/Everything/$basearch/debug
metalink=https://mirrors.fedoraproject.org/metalink?repo=epel-debug-$releasever&arch=$basearch&infra=$infra&content=$contentdir
enabled=0
gpgkey=file:///etc/pki/rpm-gpg/RPM-GPG-KEY-EPEL-8
gpgcheck=1

[epel-source]
name=Extra Packages for Enterprise Linux $releasever - $basearch - Source
# It is much more secure to use the metalink, but if you wish to use a local mirror
# place it's address here.
#baseurl=https://download.example/pub/epel/$releasever/Everything/source/tree/
metalink=https://mirrors.fedoraproject.org/metalink?repo=epel-source-$releasever&arch=$basearch&infra=$infra&content=$contentdir
enabled=0
gpgkey=file:///etc/pki/rpm-gpg/RPM-GPG-KEY-EPEL-8
gpgcheck=1
Using EPEL
At this point, once configured, we are ready to install the packages from EPEL. To start, we can list the packages available in the repository with the command:
dnf --disablerepo="*" --enablerepo="epel" list available
And an excerpt of the command
dnf --disablerepo="*" --enablerepo="epel" list available | less
Last metadata expiration check: 1:58:22 ago on Fri 25 Mar 2022 09:23:29 AM CET.
Available Packages
3proxy.aarch64                                                    0.8.13-1.el8                                    epel
AMF-devel.noarch                                                  1.4.23-2.el8                                    epel
AMF-samples.noarch                                                1.4.23-2.el8                                    epel
AusweisApp2.aarch64                                               1.22.3-1.el8                                    epel
AusweisApp2-data.noarch                                           1.22.3-1.el8                                    epel
AusweisApp2-doc.noarch                                            1.22.3-1.el8                                    epel
BackupPC.aarch64                                                  4.4.0-1.el8                                     epel
BackupPC-XS.aarch64                                               0.62-1.el8                                      epel
BibTool.aarch64                                                   2.68-1.el8                                      epel
CCfits.aarch64                                                    2.5-14.el8                                      epel
CCfits-devel.aarch64                                              2.5-14.el8                                      epel
...
From the command we can see that to install from EPEL we must force dnf to query the requested repository with the options --disablerepo and --enablerepo, this is because otherwise a match found in other optional repositories (RPM Fusion, REMI, ELRepo, etc.) could be newer and therefore have priority. These options are not necessary if you have only installed EPEL as an optional repository because the packages in the repository will never be available in the official ones. At least in the same version!
Support consideration
One aspect to consider regarding support (updates, bug fixes, security patches) is that EPEL packages have no official support from RHEL and technically their life could last the space of a development of Fedora (six months) and then disappear. This is a remote possibility but one to consider.
So, to install a package from the EPEL repositories you would use:
dnf --disablerepo="*" --enablerepo="epel" install nmon
Last metadata expiration check: 2:01:36 ago on Fri 25 Mar 2022 04:28:04 PM CET.
Dependencies resolved.
==============================================================================================================================================================
 Package                            Architecture                          Version                                    Repository                          Size
==============================================================================================================================================================
Installing:
 nmon                               aarch64                               16m-1.el8                                  epel                                71 k

Transaction Summary
==============================================================================================================================================================
Install  1 Package

Total download size: 71 k
Installed size: 214 k
Is this ok [y/N]:
Conclusion
EPEL is not an official repository for RHEL, but it can be useful for administrators and developers who work with RHEL or derivatives and need some utilities prepared for RHEL from a source they can feel confident about.
DNF Plugins
The dnf-plugins-core package adds plugins to dnf that will be useful for managing your repositories.
Note
See more informations here: https://dnf-plugins-core.readthedocs.io/en/latest/index.html
Install the package on your system:
dnf install dnf-plugins-core
Not all plugins will be presented here but you can refer to the package documentation for a complete list of plugins and detailed information.
config-manager plugin
Manage DNF options, add repos, or disable them.
Examples:
- Download a
.repofile and use it:
dnf config-manager --add-repo https://packages.centreon.com/ui/native/rpm-standard/23.04/el8/centreon-23.04.repo
- You can also set an url as a base url for a repo:
dnf config-manager --add-repo https://repo.rocky.lan/repo
- Enable or disable one or more repos:
dnf config-manager --set-enabled epel centreon
dnf config-manager --set-disabled epel centreon
- Add a proxy to your config file:
dnf config-manager --save --setopt=*.proxy=http://proxy.rocky.lan:3128/
copr plugin
copr is an automatic rpm forge, providing a repo with built packages.
- Activate a copr repo:
copr enable xxxx
download plugin
Download rpm package instead of installing it:
dnf download ansible
If you just want to obtain the remote location url of the package:
dnf download --url ansible
Or if you want to also download the dependencies:
dnf download --resolv --alldeps ansible
needs-restarting plugin
After running a dnf update, the running processes will continue to run but with the old binaries. In order to take into account the code changes and especially the security updates, they have to be restarted.
The needs-restarting plugin will allow you to detect processes that are in this case.
dnf needs-restarting [-u] [-r] [-s]
| Options | Description |
|---|---|
-u |
Only consider processes belonging to the running user. |
-r |
to check if a reboot may be required. |
-s |
to check if services need restarting. |
-s -r |
to do both in one run. |
versionlock plugin
Sometimes it is useful to protect packages from all updates or to exclude certain versions of a package (because of known problems for example). For this purpose, the versionlock plugin will be of great help.
You need to install an extra package:
dnf install python3-dnf-plugin-versionlock
Examples:
- Lock the ansible version:
dnf versionlock add ansible
Adding versionlock on: ansible-0:6.3.0-2.el9.*
- List locked packages:
dnf versionlock list
ansible-0:6.3.0-2.el9.*
Author: Antoine Le Morvan
Contributors: Colussi Franco, Steven Spencer, Ganna Zhyrnova